If Google finds any security breach in the privacy of the users then it will restrict the users from accessing the stuff online. One such warning which you may have come across while browsing Chrome is HTTPS/SSL Error with the message “Your Connection is Not Private”. The warning will come along with a Red Padlock showing the Connection is Not Secure.
What are the Reasons for Connection Not Private Error?
The Following may be the reasons for Your Connection is Not Private Error on Chrome. There may be other reasons too but in general the following cause HTTPS error on Browser.
Net::Err_Cert_Authority_Invalid
The certificate issued is obsolete.The Browser is old.The website certificate and browser connection are not secure.
Net::Err_Cert_Common_Name_Invalid
The certificate does not match issuers nameGoogle Chrome browser errorAddress error due Certificate Mismatch
Net::Err_Cert Date_Invalid
Date on the computer is wrong.
How to Fix ‘Your Connection is Not Private’ on Chrome?
Here are the best solutions to fix Connection Not Private error on Chrome Browser for Windows and Android.
Date & Time Correction
On your Windows PC click the location indicating Time/Date and correct the date to same to exact. Reload the page and you should see the warning gone with the page loaded in the Green Padlock showing the “page is Secure”.
Chrome Extension Issue
Open the error generating Web Page in the incognito mode of Chrome Browser. If the page opens securely in private mode, a Chrome extension is causing the error. To fix the error, turn off the extension. Just go to; chrome://extensions and uncheck all the extensions.
Install Trusted Certificate
This fix should only be employed if you are in very much need. Step 1. Click the HTTPS lock icon and Hit details. Also, you can go to More Tools > Developer Tools; click on the Security tab. Step 2. Click “View Certificate”. Step 3. Hit “Details” in the Certificate viewer and select the top certificate (Should be from an address other than the one you were trying) Step 4. Then hit “Export” and save the certificate file. Step 5. Go to Chrome Settings → Advanced → Manage Certificates. Step 6. Hit “Import”. Select the certificate file you saved above and hit enter granting all the options. Restart Chrome,chrome://restart (it reopens all your tabs). This will fix the problem of NET Err Cert Authority Invalid & NET Err Cert Common Name Invalid.
Import Trusted Certificate SSL
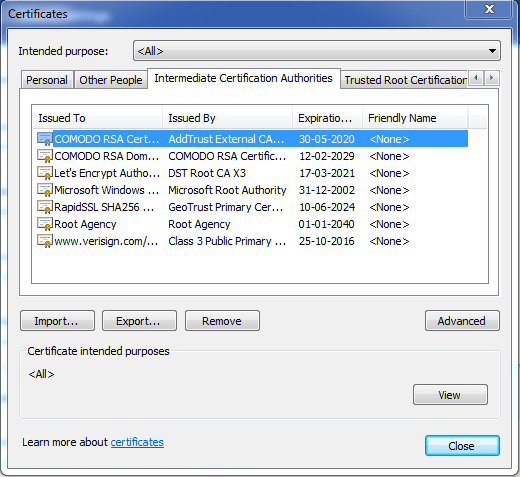
First, check the SSL certificate issuers for the website. Do a Google search and download Root CA certificate of the SSL issuer on your PC. Then, Go to Chrome Settings → Advanced → Manage Certificates Here, click on the Intermediate Authorities and import the downloaded Root certificate. This will for sure fix the warning error on Chrome. This will fix the warning NET::ERR_CERT_AUTHORITY_INVALID & NET::ERR_CERT_COMMON_NAME_INVALID.
Change Protocol DNS Settings
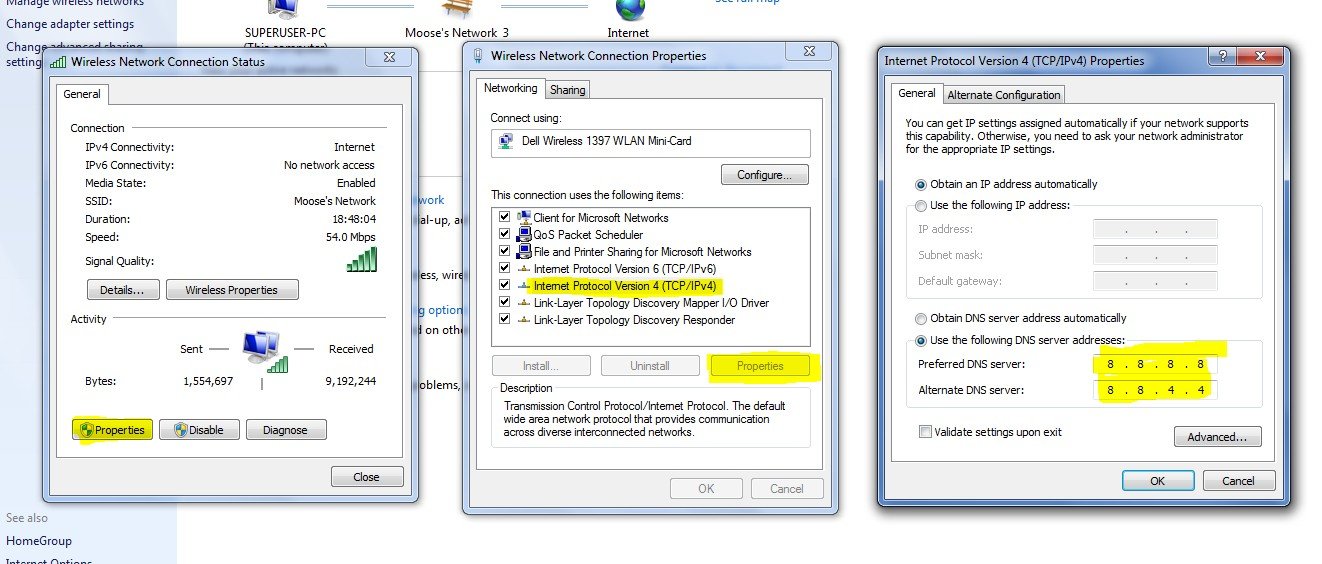
Step 1. Search ‘ncpa.cpl‘ in Windows. Step 2. Look for the option called Internet Protocol Version 4 (TCP/IPv4). Step 3. Click on it and click on the Properties button. Step 4. Now manually use following DNS servers; Preferred DNS server as 8.8.8.8 & Alternate DNS server as 8.8.4.4 (Google’s public DNS) (Set IP as automatic) Step 5. Restart the browser and check websites. This will fix the Net Err Cert Common Name Invalid error on Chrome.
Add ‘-ignore-certificate-errors’
If you wish to ignore such errors you can try this simple shortcut which you bypass all this error and you can browse without any warnings. But I recommend you to add this shortcut if you are not sharing any of your account credentials and passwords with the site.
Open Chrome Properties by right-clicking on Application.Now add -ignore-certificate-errors at the end of the Textbox in the Target Section.Restart the Chrome and reload the page issue will disappear.
Uninstall Anti-Virus Software
If you have antivirus that provides ‘HTTPS protection’ or ‘HTTPS scanning’ then it is preventing Chrome from providing security. Turn off the AV and if the page loads normally then make the necessary changes to avoid the AV to interfere with the Chrome. It is also recommended to change the Anti-Virus App if you think the issue is persistent.
Clear DNS Cache of Google Chrome
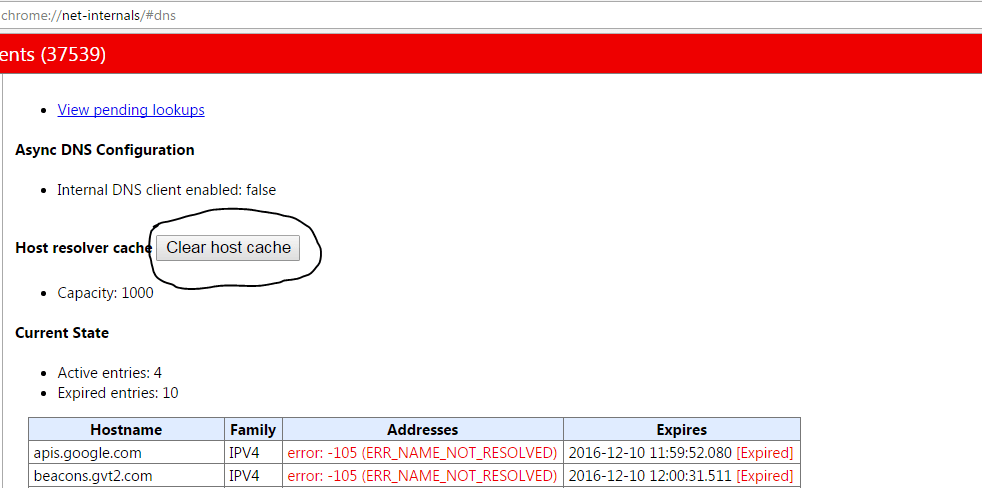
Step 1. Simply visit the URL ‘chrome://net-internals/#dns‘. Step 2. Click on Clear-Host Cache button next to Host resolver cache. Step 3. You will notice the websites are working properly. Step 4. This is one of the easiest and most useful fixes to stop the issue of DNS servers.
Clear Google Services Framework Cache | Android
Google Services Framework syncs your data and stores device data. It also helps in proper functioning of Google Play Services and related Google Apps.
Go to Settings > Application Manager > All > Google Services Framework > Tap on “Force stop” & tap then tap on “Clear cache” button.Reboot your device.
Clear the Data and Cache
For Chrome on Android
For Chrome on PC
Settings → Clear Browsing Data → Select Cookies & Caches delete → Hit Clear Browsing Data Once done, restart the Chrome App and try to reload the page.
Update Chrome
It is best recommended to update the Chrome as it updates may contain security patches which will solve the issue in case if you are recently encountering the problem while surfing. Updating the Chrome Browser and/or Windows Software if available can solve the issue to great extent. I recommend you first go with Chrome update – Settings → Help → About Chrome → Update Chrome. Conclusion: With the above solutions you can fix the Connection error on Chrome for Windows and Android without any issues and surf the web without any errors. I hope the post was helpful. Do comment below for any assistance or support if needed. Cheers! If you’ve any thoughts on Best Fix for ‘Your Connection is Not Private’ on Chrome, then feel free to drop in below comment box. Also, please subscribe to our DigitBin YouTube channel for videos tutorials. Cheers!


